Wednesday, October 12, 2011

Circles Runner

 I recently had occasion to create another wedding table runner, so I thought I'd try my hand at a new design.  I've never used circles in my quilting designs, so I was excited to experiment with them.  In the end, I think it ended up simple, modern, and lovely.  I hope the couple likes it!


 I quilted random circles all over - a first for me - so I marked them in chalk rather than doing them free form.  It took a bit longer to accomplish than my usual method.  

 Here's the back.

 I used white thread for the quilting so it would pop on the back.

 And I had to make some coasters to go with it.  I think it rounds out the gift nicely.  Here's the front of them.

And the back.

And that's it!

Thursday, August 4, 2011

Wedding Table Runner

I've been trying my hand at pattern-making recently and it's a challenge I really enjoy.  One difficulty in writing sewing patterns is that my style is so improvisational I have to take meticulous notes on what I'm doing as I go.  I'd rather just be diving in, so it goes a bit against the grain.  Another challenge is that sometimes (more often than I like), things just don't work out.  I usually have a clear picture in my head of the general feel of a piece.  Often I even make a sketch, but if something isn't working as I go, I change it.

This project is one of those cases.  I was going to make two pillows for my cousin and her new husband as a wedding present, but somewhere along the way, I was derailed.  What I came up with instead is this Wedding Table Runner.

 Because it was so improvised, I really couldn't write a pattern for it, but if you'd like to see more, check it out after the jump.

Monday, July 25, 2011

Plastic Bag Holder Tutorial

Here's a super-easy, super-quick project you could complete in an afternoon:

Plastic Bag Holder
 Materials:

Cotton fabric, pieced or solid, 20" x 25"
1/4" Elastic, cut to 10" and 6"
3/4" Ribbon, cut to 12"
Thread


 As you can see, I took some scraps from a previous project and pieced them into a design I liked.  I used a heavy cotton which kept the holder from looking lumpy once the bags were inside.  You could design any pattern you like, and a solid piece of fabric would work just as well.

This holder is a bit over-sized because I had a large space on my wall I wanted to fill.  You could easily change the height of the fabric to fit a smaller or larger space.  Keep the 20" width, and adjust height however you like.  No other measurements (for elastic or ribbon) need change.

Once you have your rectangle, lay it right side up and measure 2.5" down and 5" in from the left edge.  Mark this point with chalk or disappearing fabric pen.  Repeat with the right edge.  You will sew the ribbon to these points later.

Next fold over the bottom edge of your rectangle 1/4" and press.  Fold again 1/2" and press to make a casing for the elastic.  Repeat with the top edge of your rectangle.  Sew along the very outer edge of these folds.

Attache a safety pin to the end of your 6" elastic.

 Insert the pin into the casing at the bottom of your fabric.

 Thread the pin through the casing, taking care to stop just before the end of the elastic disappears.

 Sew over this end a few times to secure the elastic.   Keep threading the safety pin through the casing until you reach the other side, then sew over that end as well.

 The bottom of your holder will now look like this.  Repeat these steps with the 10" elastic and the top of your holder.  (This elastic is longer to allow for stuffing lots of bags into a larger opening.)

 Here's how the holder will look with the elastic in both ends.

 Next, attach the ribbon to the points you previously marked. Fold the ribbon under and sew over a few times to secure.

 Fold the bag in half length-wise with right sides together and sew ends with a 1/4" seam allowance.

Turn your bag out, and voilĂ !  

You're Done!

Saturday, July 23, 2011

Chalkboard nook

I don't know about you, but I struggle keeping track of to do lists.  Either they're on teeny scraps of paper scattered throughout the house, or on some document on my computer that I never look at.

I particularly need a good - visible - place for my list of around-the-house chores that are perfect to tackle during the weekend.  (How it works now is I live with a vague sense that I wanted to accomplish something, but instead spend hours playing Plants vs. Zombies while I wait for inspiration to strike.)

So I decided to take an uninspired corner of the kitchen and turn it into a much more attractive, much more functional To Do nook.

 First, I cleared out the space.  I removed the sad little hook holding way too many things, moved the artwork, and set the broom aside.

 I taped off a large rectangle to delineate where the chalk wall would be.  I used a yard stick and level to draw a straight line in pencil, then ran 2" painters tape along the line.

 Two inches in, I drew another rectangle and taped it off in 1" painters tape to create a border for visual interest.

 I made sure to keep the corners of the inner rectangle nice and clean.  Cutting the tape with scissors helped.

 Then I painted over the whole shebang in black chalkboard paint.  It took me two coats to get a nice clean surface.  After it dried I removed the tape.

 I hung a coat rack that was leftover from a previous project, and since the paint was also leftover and I had all the paint supplies on hand, this project cost me exactly $0!

 Tip: make sure to press the edges of the painters tape down firmly or you'll be doing some touch-up like me.

 And here's the finished look!  Now I have a place for art smocks, aprons, the broom, and a great visual reminder or all those little projects I want to take care of.

 Another view

 The added bonus is a fun new art space for the kids.  (Of course I've been warned they'll soon take over the whole wall, but until they grow a bit, I still have the top to myself.)

 A little plastic cup screwed into the wall makes a great place to hold chalk.  I placed it high enough for my 4-year-old to reach, but too high for the 1-year-old.  Since she thinks chalk is pretty tasty, it's best that she can't get into it on her own, for now.

As you can see, they're big fans.

Monday, June 6, 2011

Curses!

I'm working on something big and exciting and new, which I hope to share with you by the end of the month.  In the mean time, this little ditty is the latest addition to my craft room walls:


Isn't it sweet?  Perfect for sewing room mistakes.


I haven't done a cross stitch since I was 12, but I knew I had to do this one as soon as I saw the fantastic kit from Subversive Cross Stitch.  If you look closely you can see where I goofed a couple rows, but I'm not bothered in the slightest.  It was quick and fun, and it perfectly expresses how I feel every time I have to pick out a seam or scrape glue off my iron.

If you buy the kit, you should know the flower thread comes in red only; I added blue and purple for some variety. There's a ton of selection in the SCS shop, so if you like some snark with your craft, it's easy to get stitching!

Sunday, April 10, 2011

Fractured Rainbows


After a month of hard work I finished my first self-designed quilt!  It's a playful baby/toddler quilt with big swatches of color and since I didn't hate it when I was finished, I consider it a huge success!  River's school had an evening out for the grown-ups, complete with an auction to help support our search for a new space.  This was my donation to the cause.  I finished the binding Friday night, took some pictures Saturday morning, and handed it over that afternoon.  I didn't get to enjoy it in the house very long, but with two cats and two little kids, that's probably for the best.

The auction was a big success and the quilt is going to a lovely family, so I'm very happy.


As you can see, the pattern is pretty simple, but with just about a month to complete it, I wasn't going to attempt constructing a ton of complicated blocks.  I wanted to simulate a rainbow, but with a loose, modern interpretation (the deep purple on the bottom and binding photographed really dark, but it's not nearly that close to black in person).  Since I was able to use fabrics from my stash I didn't have to spend any extra money on it. (Which is really great considering how much money I spent bidding on other items last night!  I blame the free-flowing wine.)  


I love the back! I had just enough of the ecru fabric to finish - thank goodness!  The quilting was perhaps the most difficult part of the whole project.  Each block is quilted in matching thread, so up close there's a subtle rainbow affect on the back too.  The ecru sashing is quilted in parallel lines and all of the other blocks are done in concentric rectangles.  I marked it all out with chalk before I took it to my machine, and getting those lines to match up was quite a feat!


After a month of sewing exclusively for other people I'm ready for a project that stays in this house!  I recently picked up some fantastic Japanese fabrics and an adorable dress pattern, so I think Lila has something coming her way in the near future.  :)

Tuesday, February 22, 2011

quilted pillow

Getting back to my machine has been wonderful.  I was starting to go through withdrawals after a month and a half without it, so when I had some time last week, I plowed into the first project that caught my eye.  I've been dying to use this cute tree fabric since I snagged a fat quarter of it some months ago and these fabric boxes seemed like the ideal place for it.

After I decided what to make I realized my mother-in-law had a birthday coming up, and I knew these would make part of a great present for her.  I wanted to to something more, though, and with it being pillow month at Sew Mama Sew! my inspiration was easy to find.

 Since I first started quilting a little over a year ago, I've learned a ton.  Some of it by doing, but mostly by reading blogs and drooling over beautiful pictures.  I've tried a wonky improv quilt before (a table runner that I'm sure I would be horrified to look at now), and I wanted to try again, with a little more experience under my belt.

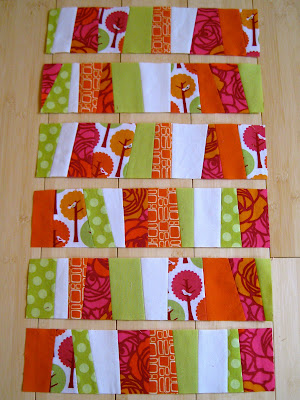
First I gathered some coordinating fabrics - using the tree fabric as a color guide - and cut them into random strips.  In the past my work has been a bit busy because I've neglected to pair any solids with the crazy patterned pieces.  This time I was conscious to use a minimal pallet and help the few patterned pieces pop.

 I sewed a bunch of random strips together into three rectangular blocks.

 I squared the edges and made them all the same length and width.

 Then I cut them into six even strips and chose my favorites.  (I'll save the others for another project.)

 Previously I would have mushed all those pieces together and made a hot mess.  But I've learned how effective it is to create negative space, largely by reading Elizabeth Harman's blog, Oh, Fransson!  I framed each block in white and squared it up.

 Then I added a green border and the pillow front was complete.  I added a big square of white to the back of this piece and quilted them together with meandering vertical lines.  That way, if the cover needs to be washed, the seams from all the patchwork wont fray and get ugly.  Instead of doing anything too wacky on the back, I left it a simple green (with an opening) and I was done!


I'm really happy with how this turned out.  If feels like most sophisticated work of quilting I've done so far, and it's given me confidence to keep trying new things.

Saturday, February 5, 2011

sewing room: paint and furniture

We moved my sewing table and shelves upstairs this week, and while the kids were napping or at school I worked on hanging cabinets and organizing my supplies.  All of the basic elements are in place and it's a functional room now.

Here's a reminder of what this room looked like just a few short weeks ago.  Those wall decals were incredibly difficult to get off and left huge un-painted patches in the wall.

 Big difference, huh?  Here you can see the wall color - a refresh of the yellow paint that was already in there - and the new chair.  We had these bronze curtains already, and I hung them because the windows needed something.  But with the faux leather chair it's feeling very masculine to me, so I'm sure I'll switch them out for something softer.

 Sewing table set up nicely and cabinets hung level (!) and even.  I added some more lighting under the cabinets, so I don't need to keep a lamp on my workspace.  The ironing table is to the right with it's fabric makeover.

And another angle.  You'll notice my ball chair - for anyone who sits at a desk for long stretches, I can't recommend the it highly enough.  It's a huge relief for my back.

I have so much more I'd love to do to add some color and personality.  But it's not going to happen anytime soon.  Thom surprised me with tickets to Vegas, so I'll be escaping the snow with the kids for a week!  (In case you didn't know, we have family there, so no, we won't be spending any time in the casinos.)

See you after my mini vacation!