Getting back to my machine has been wonderful. I was starting to go through withdrawals after a month and a half without it, so when I had some time last week, I plowed into the first project that caught my eye. I've been dying to use this cute tree fabric since I snagged a fat quarter of it some months ago and these fabric boxes seemed like the ideal place for it.
After I decided what to make I realized my mother-in-law had a birthday coming up, and I knew these would make part of a great present for her. I wanted to to something more, though, and with it being pillow month at Sew Mama Sew! my inspiration was easy to find.
Since I first started quilting a little over a year ago, I've learned a ton. Some of it by doing, but mostly by reading blogs and drooling over beautiful pictures. I've tried a wonky improv quilt before (a table runner that I'm sure I would be horrified to look at now), and I wanted to try again, with a little more experience under my belt.
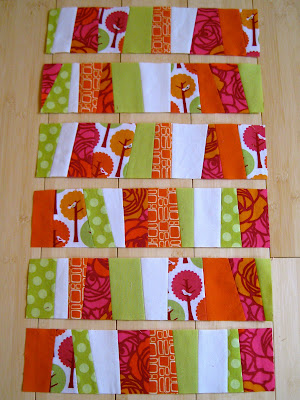
First I gathered some coordinating fabrics - using the tree fabric as a color guide - and cut them into random strips. In the past my work has been a bit busy because I've neglected to pair any solids with the crazy patterned pieces. This time I was conscious to use a minimal pallet and help the few patterned pieces pop.
I sewed a bunch of random strips together into three rectangular blocks.
I squared the edges and made them all the same length and width.
Then I cut them into six even strips and chose my favorites. (I'll save the others for another project.)
Previously I would have mushed all those pieces together and made a hot mess. But I've learned how effective it is to create negative space, largely by reading Elizabeth Harman's blog, Oh, Fransson! I framed each block in white and squared it up.
Then I added a green border and the pillow front was complete. I added a big square of white to the back of this piece and quilted them together with meandering vertical lines. That way, if the cover needs to be washed, the seams from all the patchwork wont fray and get ugly. Instead of doing anything too wacky on the back, I left it a simple green (with an opening) and I was done!
I'm really happy with how this turned out. If feels like most sophisticated work of quilting I've done so far, and it's given me confidence to keep trying new things.
Tuesday, February 22, 2011
Saturday, February 5, 2011
sewing room: paint and furniture
We moved my sewing table and shelves upstairs this week, and while the kids were napping or at school I worked on hanging cabinets and organizing my supplies. All of the basic elements are in place and it's a functional room now.
Here's a reminder of what this room looked like just a few short weeks ago. Those wall decals were incredibly difficult to get off and left huge un-painted patches in the wall.
Big difference, huh? Here you can see the wall color - a refresh of the yellow paint that was already in there - and the new chair. We had these bronze curtains already, and I hung them because the windows needed something. But with the faux leather chair it's feeling very masculine to me, so I'm sure I'll switch them out for something softer.
Sewing table set up nicely and cabinets hung level (!) and even. I added some more lighting under the cabinets, so I don't need to keep a lamp on my workspace. The ironing table is to the right with it's fabric makeover.
And another angle. You'll notice my ball chair - for anyone who sits at a desk for long stretches, I can't recommend the it highly enough. It's a huge relief for my back.
I have so much more I'd love to do to add some color and personality. But it's not going to happen anytime soon. Thom surprised me with tickets to Vegas, so I'll be escaping the snow with the kids for a week! (In case you didn't know, we have family there, so no, we won't be spending any time in the casinos.)
See you after my mini vacation!
Subscribe to:
Posts (Atom)


